Build and Test a cardboard catapult
Catapults are a cool way to learn about potential energy and kinetic energy.
Don’t have one? I’ve got you covered with some simple instructions to make one from cardboard, using mostly things you probably have on hand at home.
Build a cardboard catapult - ~25 min
build a cardboard catapult - 17:09
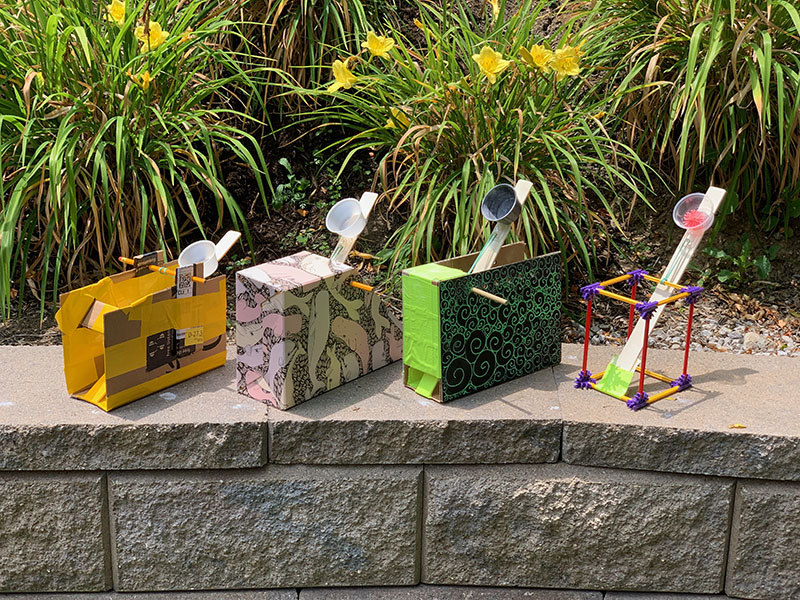
Catapult Gallery...
Build a Cardboard Catapult
Catapults are great for learning about transfer of potential energy to kinetic energy. And they’re fun to test. But, kits can be hard to find.
So, this week, your mission--should you choose to accept it–is to build a cardboard catapult, mostly from things you have on hand at home:
- wood paint stir stick (available free from any store where you can buy paint… they type you use to paint the walls of your house). Most in the US are about 14″ long by 1.125″ wide
- plastic hook (I use 3M Command damage-free hooks… this is the one thing you may need to buy… you can get them at most any grocery store like Krogers, Walmart, etc.)
- rubberband(s)… you may want more than one
- small plastic cup or yogurt cup… the condiment cups you get with pizza (for red pepper or parmesan cheese) or with salad dressing are perfect!
- pencil
- duct tape and/or clear plastic packing tape
- cardboard
- ALTERNATE: you can make a catapult out of a cardboard milk carton. It’s not my favorite catapult, but it will work.
Tools: If you don’t have a single-hole punch, you can make a hole to carry your pencil by cutting a small “X” with a knife where you would punch the hole, then push your pencil through the “X.” Test this out on a small piece of cardboard to check your technique.
The instructions below show you how to make a catapult from an Amazon A1 box… the first catapult in the photo on the left. This required taping a couple pieces of cardboard together to make the sides. If that seems confusing, watch my video for simpler ways using my templates below.
catapult templates - side, bottom, corner
alternate: left side & right side templates
data sheet & graph paper
Create a game with your catapult
Check out this video for some ideas to spice up your catapult game using a simple Plan – Do – Check – Act design cycle.
How can you make it more fun? More challenging?
What can you do to tune your catapult to hit your target?
Is there a way to predict how far your projectiles will land? Can you tweak your system to give you more flexibility with the range (distance) your catapult can reach consistently?
The Geometry of catapults
In this video, I take you on a Math Adventure as I dig into the science behind how our catapults work.
Don’t worry… I do the heavy lifting! But you’ll get to see exactly what you can do to increase your projectile velocity and range… using science and math! I even explore the impact of different launch angles!
Want to measure your projectile velocity? I show you one way to do it using an iPad or iPhone to shoot video against a grid background.
Experiment PDF coming soon… will be linked below later.
Test a cardboard catapult - part 1 - 35:04
part 2 - launch angles and more..., 24:14
Catapult egg test.. double rubber bands - 5:25
testing your catapult + adjusting lever arm angle (below) - 2:18
test a cardboard catapult & create a game
Okay, so you’ve built your catapult. Now it’s time to test it!
Take measurements. Weigh your projectiles. Do you see any trends? Learn about potential energy and kinetic energy. Can you make your projectiles go farther? How? Can you predict how far your projectile will go? Can you develop a game using your catapult?
Materials needed:
- A cardboard catapult (made last week)
- A digital scale (to weigh your projectiles)
- A tape measure… so you can measure how far your projectiles fly
- A variety of balls to test your catapult… such as a cotton ball, ping pong ball, whiffle ball, golf ball, small bouncy ball… even small nuts or pine cones.
- You can use silly putty to make and test different sized balls.
- A sheet of paper to record the distances your projectiles go.
- A piece of graph paper (template provided) to plot your results.
- OPTIONAL: a yoga mat and some baby powder… if you dip your projectile in baby powder and your range is such that you can get it to land on the yoga mat, it’ll leave a white mark where it lands, making it easier to get good measurements. This even works on concrete (like a driveway!)
Test Steps
- STEP 1 – Pick a lever arm position for your first set of tests. I used position #3.
- STEP 2 – Select your projectiles and weigh them, and record that on your data sheet.
- STEP 3 – Lay out your tape measure, get your baby powder (we’ll roll our projectiles in this so they leave a mark when they land… easier to get accurate distance data), and START TESTING!
- STEP 4 – Check the distance each projectile travels–look for the white mark–and record that on your data sheet next to its weight.
- STEP 5 – Plot your data on a Graph Sheet… do you see any trends?
You should notice something interesting… as the weight of your projectile increases, the distance decreases. Why is that?
Next Question…. What can we do to AIM our catapults? What if we want to vary the distance (or range) that our projectiles travel? What do we have to work with?
Catapults convert POTENTIAL ENERGY stored in our RUBBER BAND into KINETIC ENERGY… of the moving lever arm and our PROJECTILE.
The POTENTIAL ENERGY stored is a function of the spring constant of our RUBBER BAND, and how much we STRETCH it.
We convert that potential energy (stored energy) into KINETIC ENERGY (moving energy).
The general equation for KINETIC ENERGY is 1/2 * mass * velocity * velocity.
Our system is a little more complicated than our egg drop system… we’re also using some of that energy to move the lever arm as well as the projectile. Don’t worry about that. It’s a constant for our system. You’ll still see a relationship between the weight or mass of our projectile and the velocity or distance that it travels.
TRICK QUESTION… We’re measuring DISTANCE and WEIGHT.
But our relationship for Kinetic Energy is a function of mass (=weight) and VELOCITY.
Is there a relationship between VELOCITY and DISTANCE?
DISTANCE = VELOCITY * TIME…. and actually it’s the horizontal component of velocity that matters here.
So the hang time that the projectile stays in the air determines how long it has to travel. Got it? Make sense?
SO… Advanced question…. What can we do to alter our hang time?
Well, we can change our launch angle. A more vertical launch angle will give us more hang time, but at the expense of horizontal velocity. Which is more important for our catapults? Test and find out!
What if we still want more RANGE? Is there a way to jump the curve and get even more distance?
Well… can you think of a way to put more POTENTIAL energy into the system?
The POTENTIAL ENERGY is a function of the spring constant of our rubber band, and the amount of STRETCH or elongation. We can increase the potential energy stored by stretching our rubber band more (changing the launch angle), or by increasing the spring constant.
Any ideas how to do that?
If you guessed adding a second rubber band, or using a stiffer rubber band, you’re right!
Check out the first video to see some tests using 1 rubber band and firing the catapult at a target, then using 2 rubber bands.
Can you think of other games you can play with your catapult?
PLEASE…. Do not AIM your catapult at another person or animal. It can make a fun game to let your cat or dog CHASE a ball that you shoot with your catapult.
SHARE a picture or video of your catapult by posting in this thread!
I’ll be live on the Girl Scouts of Western Ohio Summer Camp 2020 Facebook Page Friday, July 10, 2020 at 1 pm EDT to answer your questions.